System Information Dialog Box
When starting a new project with SOFiSTiK FEA, the “SOFiSTiK System Information”
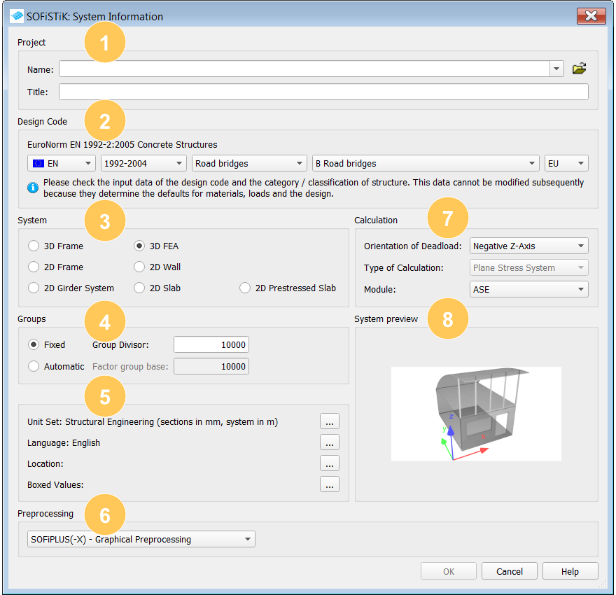
1. Project
First of all, it is necessary to define a location on your local hard drive to store all project data. It is possible to use a network drive too. However, this might slow down your company network. The software accesses the database continuously when generating your system, run the analysis or run post-processing applications such as Result Viewer or WINGRAF what causes traffic.
Each project has its name, and this is the input field to assign it. The title of the project shows up in the headers of the documentation.
2. Design Code
This part defines the code relevant information for your project. You can select the country, code number, kind of structure, classification as well as the national annex. Please keep in mind, you can’t change the design code after confirming the System Information dialog box input. The reason for that is simple, as every design code brings specific combination and load factors you’d mess up your running project.
3. System
7 System types are available.
3D Frame, 2D Frame and 2D Girder System represent the System options with Beam elements only. 2D Wall and 2D Slab and 2D Prestressed Slab allow using Shell/quad elements. 3D FEA – I’d like to call it the all in option – enables to use every kind of element type in your System. You can quickly check the selected system type visually in the System preview (8).
4. Groups
Select one of the two option to control the behaviour of the numbering and group assignment. Group Divisor and Factor Group Base
5. The section without a name
Although this section doesn’t have a header, it doesn’t mean it isn’t important. Actually, it’s the complete opposite, at least in my opinion.
- Unit Set: allows changing the input and output units of your project. Basically, there are a few predefined sets available. However, modifying one or more specific units of these templates is possible.
- Language: English and German are available as input languages only.
For your output language, you can select out of English, German, Spanish, French, Greek, Italian or Russian. - Location: allows to define the project location and influences the
combination factors of the selected design code. Your model can be set up based on the zerolevel , no need to place it to the original geometrical height. - Boxed values
: this is a brilliant one. It allows influencing specific code-related factors of design, loads and combinations. The purpose of this feature is clear, it enables you to cover additional national annexes besides the implemented ones.
6. Pre-processing
There are quite a lot of options for pre-processing available. Let’s start from top to bottom.
- Teddy is the numerical input of SOFiSTiK and allows you to set up your project entirely text-based. No option for new users and honestly since the graphical pre-processing becomes more productive with each new release of SOFiSTiK the use of teddy for modelling from scratch isn’t that popular anymore.
- SOFiPLUS is an AutoCAD add-on to do the graphical pre-processing. It was a real game changer. SOFiPLUS allows creating your model by using native AutoCAD commands and transfer AutoCAD elements into relevant analytical parts. The generated system and entered information will be stored as a native
dwg . - COLUMN – Reinforced Concrete Column.
When choosing Column, you will get a predefined template to design a single column by entering loads, eccentricities, combination rules. The analysis will be done based on the nominal curvature method. Running a fire design is possible too. - COLUMN-X – Extended Reinforced Concrete Column.
The extended Version of COLUMN allows running the analysis in a broader range of cross section inclusively user defined cross-section (Cross Section Editor within SOFiPLUS) and coated steel cross-section. - FOOTING – Isolated Foundation
The SSD task FOOTiNG allows based on given loads to calculate the necessary foundation dimensions. As well to run design checks on existing foundation dimensions. Footing allows assigning vertical forces, moments and horizontal forces. Required design combinations are automatically determined. And it is possible to consider 2nd order effects. - Revit
Since BIM becomes an important factor in construction industries, it is as well essential to provide a direct interface. By using Autodesk Revit as a pre-processor and the FEA Extensions, the information of the analytical model, loads, and actions can be transferred directly to the SOFiSTiK database – A seamless interface. Furthermore, this workflow allows generating 3D rebars in Revit based on the design results within SOFiSTiK FEA. - Rhino – Graphical Pre-processing
The interface for Rhino works almost in the same way as SOFiPLUS for AutoCAD. It allows you to transfer nodes, lines and areas as well as support conditions to structural elements which are considered when exporting to SOFiSTiK FEA. - Wizard for Beam and Slab Bridges
It is a guided wizard to create standardised beam and slab bridges. Starts at the geometry of the bridge and ends up in the design of the bridge members.
7. Calculation
This section allows you to set up the orientation of the dead load, type of calculation and to select between different solver.
- Orientation of Deadload
This option allows choosing the direction of the dead load. The default option is Negative Z-Axis. - Type of Calculation
When choosing 2D Wall as System, you are able to switch from Plane Stress System to Axial Symmetric System. - Module
If applicable, you can choose between the Solver ASE, TALPA and STAR2. The default is set to ASE (Advanced Solver Engine).
8. System preview
This part of the dialog box shows a preview of the selected System.
This brings me almost to the end of this post. There is one last thing I like to mention, in the right lower corner you will find the Help button. Hitting it opens the SOFiSTiK basic manual, where you can find more general information about SOFiSTiK FEA, interfaces, workflow and lots more.
Software version related to this post: SOFiSTiK FEA v2018-03.